Authored by Dr. Tiziana Ligorio for AI Agents - CSCI 395.32 taught at Hunter College of The City University of New York
In this demo, we build a simple AI workflow that demonstrates the Retrieval Augmented Generation (RAG) pattern using a fully local stack with no API calls required.

This tutorial deliberately keeps its RAG pipeline simpler than the hosted version. Because chunking strategy, retrieval quality, and failure diagnosis were developed at length in the cloud RAG tutorial (https://
We will create a FastHTML tutor that can answer questions about the FastHTML library by retrieving relevant information from its documentation.
Our workflow consists of the following stages:
Document Loading — Load the FastHTML documentation from a text file
Chunking — Split the documentation into manageable pieces
Embedding — Create vector embeddings for each chunk using Ollama
Storage — Store the embeddings in a local Postgres database with pgvector
Retrieval — Query the database for relevant chunks based on user questions
Generation — Use the retrieved context to generate accurate answers
This tutorial mirrors the hosted RAG tutorial (using OpenRouter and Supabase) but runs entirely on your local machine. This approach offers:
Full privacy — Your data never leaves your machine
No API costs — After initial setup, everything runs locally
Offline capability — Works without an internet connection
We use Ollama for local LLM and embeddings, and Postgres with pgvector for vector storage.
Prerequisites Setup
Before running this notebook, you need to install and set up two components:
Ollama — Local LLM server
Docker — To run Postgres with pgvector
Step 1 — Install and Set Up Ollama
Download and install Ollama from https://
ollama .com /download Start Ollama:
macOS: Open Ollama from Applications (or Spotlight: Cmd+Space, type “Ollama”). A llama icon will appear in your menu bar.
Windows: Open Ollama from the Start menu. A llama icon will appear in your system tray.
Linux: Run
ollama servein a terminal (keep it running, or run as a background service).
Open a terminal and pull the models we’ll use:
# Pull a chat model
ollama pull llama3.2

# Pull an embedding model
ollama pull mxbai-embed-large
Verify the models are available:
ollama listYou should see both models listed.
Step 2 — Install Docker and Start Postgres with pgvector
Download and install Docker from https://
docs .docker .com /get -docker/ Start Docker:
macOS: Open Docker from Applications (or Spotlight: Cmd+Space, type “Docker”). Wait for the whale icon in the menu bar to stop animating.
Windows: Open Docker Desktop from the Start menu. Wait for the whale icon in the system tray to show “Docker Desktop is running”.
Linux: Run
sudo systemctl start docker(orsudo service docker starton older systems).
Open ternimal and start a Postgres container with pgvector:
docker run -d \
  --name pgvector \
  -e POSTGRES_USER=postgres \
  -e POSTGRES_PASSWORD=postgres \
  -e POSTGRES_DB=vectors \
  -p 5432:5432 \
  pgvector/pgvector:pg16
Verify it’s running:
docker psYou should see the pgvector container running.
Note: To stop the container later: docker stop pgvector
To restart it: docker start pgvector
Installs and Imports
%%capture
%pip install ollama psycopg2-binary
%%capture hides the pip install output to keep the notebook clean.
# Ollama: Python client for running local LLMs and embeddings
import ollama

# psycopg2: PostgreSQL adapter for Python
import psycopg2

# Standard library
import hashlib  # For generating content hashes to prevent duplicate document insertions
Ollama is a tool for running large language models locally. It provides a simple API for chat completions and embeddings, similar to OpenAI’s API but running entirely on your machine.
psycopg2 is the most popular PostgreSQL adapter for Python. We use it to connect to our local Postgres database with pgvector.
Initialize the Clients
We need to set up:
Ollama — Already running as a service, we just use the
ollamamodulePostgres connection — Connect to our local database
We’ll also define the models we’ll use:
Chat model:
llama3.2for generating responsesEmbedding model:
mxbai-embed-largefor creating vector embeddings (1024 dimensions)
# Database connection parameters
DB_HOST = "localhost"
DB_PORT = "5432"
DB_NAME = "vectors"
DB_USER = "postgres"
DB_PASSWORD = "postgres"

# Models to use
CHAT_MODEL = "llama3.2"
EMBEDDING_MODEL = "mxbai-embed-large"
EMBEDDING_DIM = 1024  # mxbai-embed-large produces 1024-dimensional vectors

# Test Ollama connection
try:
    response = ollama.list()
    print(f"Ollama is running. Available models: {[m.model for m in response.models]}")
except Exception as e:
    print(f"Error connecting to Ollama: {e}")
    print("Make sure Ollama is running (try 'ollama serve' in terminal)")

# Test Postgres connection
try:
    conn = psycopg2.connect(
        host=DB_HOST,
        port=DB_PORT,
        dbname=DB_NAME,
        user=DB_USER,
        password=DB_PASSWORD
    )
    conn.close()
    print(f"Postgres connection successful to {DB_NAME}")
except Exception as e:
    print(f"Error connecting to Postgres: {e}")
    print("Make sure the Docker container is running")
Ollama is running. Available models: ['qwen2.5:7b', 'mxbai-embed-large:latest', 'nomic-embed-text:latest', 'llama3.2:latest']
Postgres connection successful to vectors
Verify the Models Are Installed
The check above confirms that the Ollama service is reachable. Now check that the model we want to use, CHAT_MODEL, is installed.
Aalso confirm that EMBEDDING_DIM matches what the embedding model actually produces, so we can use it to create the vector store table.
# The service being reachable does not mean the models are installed.
installed = [m.model for m in ollama.list().models]

for name in (CHAT_MODEL, EMBEDDING_MODEL):
    # ollama.list() reports tagged names like "llama3.2:latest"
    if any(m == name or m.startswith(name + ":") for m in installed):
        print(f"Found: {name}")
    else:
        raise RuntimeError(f"Model '{name}' is not installed. Run:  ollama pull {name}")

# EMBEDDING_DIM must match what the model actually produces, because the
# documents table is created with vector(EMBEDDING_DIM) in the next cell.
actual_dim = len(ollama.embed(model=EMBEDDING_MODEL, input="dimension probe").embeddings[0])
if actual_dim != EMBEDDING_DIM:
    raise RuntimeError(
        f"EMBEDDING_DIM is {EMBEDDING_DIM} but {EMBEDDING_MODEL} produces {actual_dim}. "
        f"Set EMBEDDING_DIM = {actual_dim} (see 'Resetting the Database')."
    )

print(f"EMBEDDING_DIM {EMBEDDING_DIM} matches {EMBEDDING_MODEL}")
Found: llama3.2
Found: mxbai-embed-large
EMBEDDING_DIM 1024 matches mxbai-embed-large
Set Up the Database
We need to enable the pgvector extension and create our documents table.
def get_db_connection():
    """Create and return a database connection."""
    return psycopg2.connect(
        host=DB_HOST,
        port=DB_PORT,
        dbname=DB_NAME,
        user=DB_USER,
        password=DB_PASSWORD
    )

# Enable pgvector extension and create table
conn = get_db_connection()
cur = conn.cursor() # Create a cursor

# Enable the vector extension
cur.execute("CREATE EXTENSION IF NOT EXISTS vector;")

# Create the documents table
cur.execute(f"""
    CREATE TABLE IF NOT EXISTS documents (
        id BIGSERIAL PRIMARY KEY,
        content TEXT NOT NULL,
        embedding vector({EMBEDDING_DIM}),
        content_hash TEXT UNIQUE
    );
""")

# CREATE TABLE IF NOT EXISTS does nothing at all if the table already exists. If you
# changed embedding models, the old table would silently keep the old vector size
# and the mismatch would not surface until the insert step.To prevent that,
# read the embeddings column's real type back and compare.
cur.execute("""
    SELECT format_type(atttypid, atttypmod)
    FROM pg_attribute
    WHERE attrelid = 'documents'::regclass AND attname = 'embedding';
""")
actual_type = cur.fetchone()[0]
expected_type = f"vector({EMBEDDING_DIM})"

conn.commit()
cur.close()
conn.close()

if actual_type != expected_type:
    raise RuntimeError(
        f"The existing documents table stores {actual_type}, but this notebook is "
        f"configured for {expected_type}. Drop the table (see 'Resetting the Database' "
        f"at the end of this notebook) and run this cell again."
    )

print(f"Database setup complete: pgvector enabled and documents table created ({actual_type})")
Database setup complete: pgvector enabled and documents table created (vector(1024))
Step 1: Document Loading
The first step in building a RAG system is loading the source documents. In our case, we have a single text file containing the FastHTML documentation.
# Load the FastHTML documentation
with open("FastHTML.txt", "r", encoding="utf-8") as f:
    document = f.read()

print(f"Loaded document with {len(document)} characters")
document[:200]
Loaded document with 403766 characters
'### Minimal FastHTML Application Example\n\nSource: https://www.fastht.ml/docs/ref/concise_guide.html\n\nDemonstrates a basic FastHTML application setup. It includes defining an app instance, a route with'Step 2: Chunking
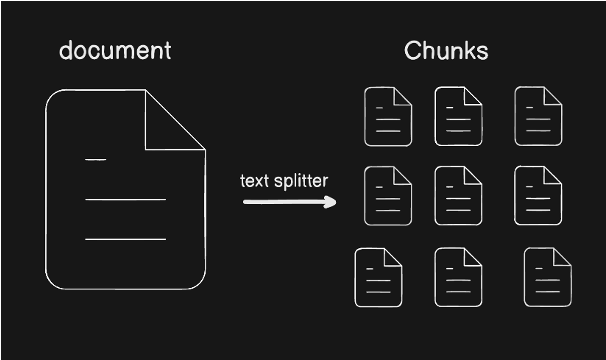
Large documents need to be split into smaller pieces (chunks) for two reasons:
Embedding models have token limits — Most embedding models can only process a limited amount of text at once
Retrieval precision — Smaller chunks allow us to retrieve more relevant, focused context
Chunking Strategy
We’ll implement a simple character text splitter to demonstrate how chunking works:
Split the text into chunks of approximately 500 characters
Include 80 characters of overlap between chunks to preserve context across boundaries
The overlap ensures that if important information spans a chunk boundary, it will appear in at least one complete chunk.
Note: Since our FastHTML documentation is in markdown format, a better choice might be to use a markdown-aware splitter such as MarkdownTextSplitter from the langchain-text-splitters package. These splitters respect markdown structure (headers, code blocks, etc.) and can preserve header hierarchy as metadata. Here, we implement a simple character-based splitter to illustrate the core concepts.
def chunk_text(text: str, chunk_size: int = 500, overlap: int = 80) -> list[str]:
    '''Split text into overlapping chunks, preferring natural boundaries.'''
    if chunk_size <= 0:
        raise ValueError("chunk_size must be greater than zero")
    if overlap < 0 or overlap >= chunk_size:
        raise ValueError("overlap must satisfy 0 <= overlap < chunk_size")

    chunks = []
    start = 0

    while start < len(text):
        end = min(start + chunk_size, len(text))

        # When possible, finish near a paragraph, newline, or sentence boundary
        if end < len(text):
            window = text[start:end]
            candidates = [
                window.rfind("\n\n"),
                window.rfind("\n"),
                window.rfind(". "),
            ]
            break_point = max(candidates)
            if break_point >= int(chunk_size * 0.7):
                end = start + break_point + 1

        chunk = text[start:end].strip()
        if chunk:
            chunks.append(chunk)

        if end == len(text):
            break
        start = end - overlap

    return chunks
# Split the document into chunks
chunks = chunk_text(document, chunk_size=500, overlap=80)

print(f"Created {len(chunks)} chunks")
print(f"\nExample chunk (chunk 0):\n{chunks[0][:500]}...")
print(f"\nChunk sizes: min={min(len(c) for c in chunks)}, max={max(len(c) for c in chunks)}, avg={sum(len(c) for c in chunks)//len(chunks)}")
Created 1046 chunks
Example chunk (chunk 0):
### Minimal FastHTML Application Example
Source: https://www.fastht.ml/docs/ref/concise_guide.html
Demonstrates a basic FastHTML application setup. It includes defining an app instance, a route with type-constrained parameters, and serving the application. The example highlights FastHTML's approach to routing, HTML generation using FastTags, and automatic server startup.
```python
# Meta-package with all key symbols from FastHTML and Starlette....
Chunk sizes: min=173, max=500, avg=464
Step 3: Create Embeddings
Embeddings are numerical representations of text that capture semantic meaning. Similar texts will have similar embeddings (vectors that are close together in high-dimensional space).
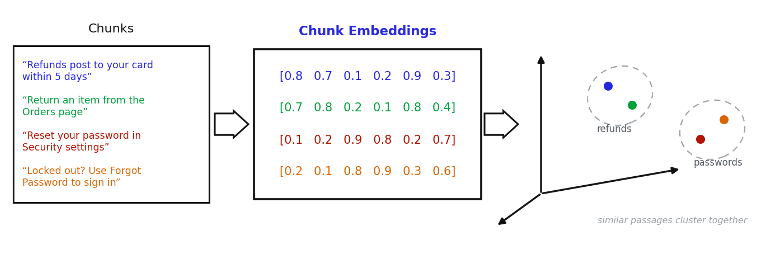
We use Ollama’s mxbai-embed-large model, which produces 1024-dimensional vectors. This model runs entirely locally and provides strong retrieval performance for technical content.
How Embeddings Work
Text goes into the embedding model
The model outputs a vector of 1024 floating-point numbers
These numbers encode the semantic meaning of the text
Similar meanings → similar vectors → can be found via similarity search
Note: Generating embeddings for the whole document runs locally on your machine, so the embedding step below can take a few minutes depending on your hardware.
def get_embedding(text: str) -> list[float]:
    """
    Get the embedding vector for a piece of text using Ollama.

    Args:
        text: The text to embed

    Returns:
        A list of floats representing the embedding vector
    """
    response = ollama.embed(
        model=EMBEDDING_MODEL,
        input=text
    )
    return response.embeddings[0]
Pedagogical note: Always understand what you are working with! Explore response directly to understand its structure
response = ollama.embed(
    model=EMBEDDING_MODEL,
    input="What is FastHTML?"
)

print(f"Response fields: {response.model_dump().keys()}")
print(f"Number of embeddings: {len(response.embeddings)}")
print(f"Embedding dimension: {len(response.embeddings[0])}")
Response fields: dict_keys(['model', 'created_at', 'done', 'done_reason', 'total_duration', 'load_duration', 'prompt_eval_count', 'prompt_eval_duration', 'eval_count', 'eval_duration', 'embeddings'])
Number of embeddings: 1
Embedding dimension: 1024
# Test the embedding function with a sample text
sample_embedding = get_embedding("What is FastHTML?")
print(f"Embedding dimension: {len(sample_embedding)}")
print(f"First 10 values: {sample_embedding[:10]}")
Embedding dimension: 1024
First 10 values: [-0.055831574, -0.045276552, -0.03962449, 0.058835875, -0.017381666, -0.0074752322, -0.0030449165, -0.024085538, 0.060129706, 0.029415373]
# Generate embeddings for all chunks
# This may take a few minutes depending on the number of chunks
print(f"Generating embeddings for {len(chunks)} chunks...")

embeddings = []
for i, chunk in enumerate(chunks):
    embedding = get_embedding(chunk)
    embeddings.append(embedding)
    if (i + 1) % 50 == 0:
        print(f"  Processed {i + 1}/{len(chunks)} chunks")

print(f"Done! Generated {len(embeddings)} embeddings")
Generating embeddings for 1046 chunks...
Processed 50/1046 chunks
Processed 100/1046 chunks
Processed 150/1046 chunks
Processed 200/1046 chunks
Processed 250/1046 chunks
Processed 300/1046 chunks
Processed 350/1046 chunks
Processed 400/1046 chunks
Processed 450/1046 chunks
Processed 500/1046 chunks
Processed 550/1046 chunks
Processed 600/1046 chunks
Processed 650/1046 chunks
Processed 700/1046 chunks
Processed 750/1046 chunks
Processed 800/1046 chunks
Processed 850/1046 chunks
Processed 900/1046 chunks
Processed 950/1046 chunks
Processed 1000/1046 chunks
Done! Generated 1046 embeddings
Step 4: Store in Postgres
Now we store our chunks and their embeddings in our local Postgres database.
Before inserting the current chunk set, we clear the table so that re-running with different chunk settings does not leave stale chunks behind. We also use ON CONFLICT to keep the insert idempotent within a run: if a chunk with the same content hash already exists, we update it rather than create a duplicate.
def get_content_hash(text: str) -> str:
    """Generate a hash of the content to use as a unique identifier."""
    return hashlib.md5(text.encode()).hexdigest() # creates a hash as a 32-character hex string

# Insert all chunks and embeddings into Postgres.
# ON CONFLICT ... DO UPDATE (an "upsert") is a safeguard for the case where two
# chunks have identical text: without it the UNIQUE constraint would raise an error.
print(f"Upserting {len(chunks)} documents into Postgres...")

conn = get_db_connection()
cur = conn.cursor()

# Clear existing rows so re-running with different chunking does not leave stale chunks
cur.execute("DELETE FROM documents;")

for i, (chunk, embedding) in enumerate(zip(chunks, embeddings)):
    content_hash = get_content_hash(chunk)

    cur.execute("""
        INSERT INTO documents (content, embedding, content_hash)
        VALUES (%s, %s, %s)
        ON CONFLICT (content_hash)
        DO UPDATE SET content = EXCLUDED.content, embedding = EXCLUDED.embedding;
    """, (chunk, embedding, content_hash))

    if (i + 1) % 50 == 0:
        print(f"  Processed {i + 1}/{len(chunks)} documents")
        conn.commit()

conn.commit()
cur.close()
conn.close()

print(f"Done! Upserted {len(chunks)} documents into Postgres")
Upserting 1046 documents into Postgres...
Processed 50/1046 documents
Processed 100/1046 documents
Processed 150/1046 documents
Processed 200/1046 documents
Processed 250/1046 documents
Processed 300/1046 documents
Processed 350/1046 documents
Processed 400/1046 documents
Processed 450/1046 documents
Processed 500/1046 documents
Processed 550/1046 documents
Processed 600/1046 documents
Processed 650/1046 documents
Processed 700/1046 documents
Processed 750/1046 documents
Processed 800/1046 documents
Processed 850/1046 documents
Processed 900/1046 documents
Processed 950/1046 documents
Processed 1000/1046 documents
Done! Upserted 1046 documents into Postgres
# Sanity check: verify documents are in the database
conn = get_db_connection()
cur = conn.cursor()

cur.execute("SELECT COUNT(*) FROM documents;")
count = cur.fetchone()[0]

cur.close()
conn.close()

print(f"Documents table contains {count} entries")
Documents table contains 1046 entries
Step 5: Retrieval
Now we can search our vector database to find chunks relevant to a user’s question.
We use cosine distance (<=>) to measure similarity between vectors.
def search_documents(query: str, match_count: int = 5) -> list[dict]:
    """
    Search for documents similar to the query.

    Args:
        query: The search query
        match_count: Number of results to return

    Returns:
        List of matching documents with their similarity scores
    """
    # Get embedding for the query
    query_embedding = get_embedding(query)

    # Search for similar documents
    conn = get_db_connection()
    cur = conn.cursor()

    """
    <=> is cosine distance operator (0 = identical, 2 = opposite)
    %s::vector casts the Python list parameter to a Postgres vector type
    1 - (embedding <=> %s::vector) as similarity - Converts distance to similarity (1 = identical, -1 = opposite)
    """

    cur.execute("""
        SELECT id, content, 1 - (embedding <=> %s::vector) as similarity
        FROM documents
        ORDER BY embedding <=> %s::vector
        LIMIT %s;
    """, (query_embedding, query_embedding, match_count))

    results = []
    for row in cur.fetchall():
        results.append({
            "id": row[0],
            "content": row[1],
            "similarity": row[2]
        })

    cur.close()
    conn.close()

    return results
# Test the search function
results = search_documents("How do I create a route in FastHTML?", match_count=3)
print(f"Found {len(results)} matching documents:\n")
for i, doc in enumerate(results):
print(f"--- Result {i+1} (similarity: {doc['similarity']:.4f}) ---")
print(doc['content'][:300] + "...")
print()Found 3 matching documents:
--- Result 1 (similarity: 0.7854) ---
action
Source: https://www.fastht.ml/docs/tutorials/jupyter_and_fasthtml.html
Defines a new route '/click' that responds to HTMX requests. This demonstrates the ability to dynamically add or modify routes in a running FastHTML application without restarting the server.
```python
@rt
def click(): ...
--- Result 2 (similarity: 0.7831) ---
x-target="#result">Load Content</button>
```
--------------------------------
### Alternative FastHTML Route Definition using app.route
Source: https://www.fastht.ml/docs/explains/routes.html
Shows an alternative way to define routes using `app.route`, where the function name dictates the HTTP m...
--- Result 3 (similarity: 0.7824) ---
tht.ml/docs/apilist.txt
Adds a standard HTTP route to the FastHTML application. This method allows specifying the path, allowed HTTP methods, route name, schema inclusion, and a body wrapper function.
```python
@patch
def route(self, path, methods=['GET'], name=None, include_in_schema=True, body_w...
Step 6: Generation
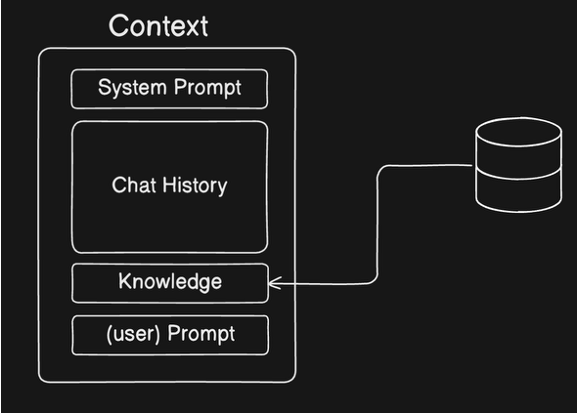
Now we combine everything into a complete RAG pipeline:
Take the user’s question
Retrieve relevant documents from our vector database
Include those documents as context in the prompt
Generate an answer using the LLM
This is where the “Augmented” in Retrieval-Augmented Generation comes in — we augment the LLM’s knowledge with retrieved context.
Pin the temperature to 0
temperature controls how much randomness the model uses when picking each next token. Ollama’s default is greater than 0, so asking the same question twice can give you two different answers — as you will see if you re-run a generation cell before making this change.
We set temperature=0 so the model always takes its most likely continuation. This buys us two things that matter in a tutorial:
The outputs stored in this notebook are the outputs you should get. If your answer differs, that is a signal worth investigating, not sampling noise.
Comparisons become meaningful. When we change the prompt, the chunk size, or the number of retrieved documents, any difference in the answer is attributable to that change rather than to chance.
A production assistant often wants some variation in its phrasing. An example you are expected to reason about does not.
def ask_fasthtml_tutor(question: str, num_docs: int = 5) -> str:
    """
    Ask the FastHTML tutor a question.

    Args:
        question: The user's question about FastHTML
        num_docs: Number of documents to retrieve for context

    Returns:
        The tutor's response
    """
    # Step 1: Retrieve relevant documents
    docs = search_documents(question, match_count=num_docs)

    # Step 2: Build context from retrieved documents
    context = "\n\n---\n\n".join([doc["content"] for doc in docs])

    # Step 3: Create the prompt with context
    system_prompt = """You are a FastHTML tutor. Answer only from the documentation context provided below.

Follow these rules:
1. Use only what the context states. Do not add facts, recommendations, or
   behavior from your general knowledge of other web frameworks.
2. Show code only by copying it from the context, and make sure your
   description matches the code you show.
3. When the context states a rule, keep it in the documentation's own terms.
   Do not extend it to cases the context does not mention.
4. If the context does not contain enough information, say so plainly
   instead of filling the gap."""

    user_prompt = f"""Context from FastHTML documentation:

{context}

---

Question: {question}

Please provide a clear, helpful answer based on the documentation above."""

    # Step 4: Generate response using Ollama
    response = ollama.chat(
        model=CHAT_MODEL,
        messages=[
            {"role": "system", "content": system_prompt},
            {"role": "user", "content": user_prompt}
        ],
        options={"temperature": 0}  # deterministic output; see the note above
    )

    return response['message']['content']
# Test the complete RAG pipeline
question = "How do I create a route in FastHTML?"
answer = ask_fasthtml_tutor(question)
print(f"Question: {question}\n")
print(f"Answer:\n{answer}")Question: How do I create a route in FastHTML?
Answer:
According to the documentation, there are two ways to define routes in FastHTML:
1. **Using `@rt` decorator**:
```python
@rt
def click(): return P('You clicked me!')
```
This method defines a new route '/click' that responds to HTMX requests.
2. **Using `app.route` function**:
```python
rt = app.route
@rt('/')
def post(): return "Going postal!"
```
This method allows specifying the path, allowed HTTP methods, route name, schema inclusion, and a body wrapper function.
3. **Using `@patch` decorator with custom route definition**:
```python
@patch
def route(self, path, methods=['GET'], name=None, include_in_schema=True, body_wrap=None):
"""Add a route at `path`"""
pass
```
This method allows specifying the path, allowed HTTP methods, route name, schema inclusion, and a body wrapper function.
All of these methods can be used to create routes in FastHTML.
Check the answer
All three code snippets appear verbatim in FastHTML.txt (test with a quick search over the file).
Only the first method is both correct and correctly described. The answer for items 2 and 3 is wrong in a way that is harder to see.
The third “method” is not a way to create a route, but it comes from a section describing FastHTML’s API internals, and its body is pass. The second item then repeats that same section’s description instead of its own.
What kind of failure is this?
Not fabrication, and not a retrieval miss. Every chunk retrieved is genuinely about routes, and the information needed to answer well was present.
One problem is that our corpus mixes two kinds of material: tutorial examples written for users, and API reference describing the library’s internals, and nothing in a chunk marks which is which. At 500 characters each chunk arrives looking self-contained and equally authoritative, stripped of the surrounding context that would tell you one of them is reference documentation.
Lecture 6 names the remedies. Metadata travels with every chunk, so a chunk can carry the fact that it came from a section that describes API internals. Metadata filters can then exclude reference material from a “how do I” question.
Notice too that we pass the retrieved chunks to the model as one undifferentiated block. In this tutorial we did not include the [1] labels distinguishing the chunks and saying where each piece came from, so there is nothing for the model to keep its descriptions anchored to, and nothing for it to cite.
Does this contradict the idea that RAG reduces hallucination?
At first glance, yes. Retrieval supplied accurate, relevant evidence and the answer was still partly wrong. So it is worth being precise about what RAG actually promises.
Without RAG
The cell below asks the same model the same question, with no retrieved context at all.
def ask_without_rag(question: str) -> str:
    """Ask the model the same question with no retrieved context."""
    response = ollama.chat(
        model=CHAT_MODEL,
        messages=[
            {"role": "system", "content": "You are a FastHTML tutor."},
            {"role": "user", "content": question}
        ],
        options={"temperature": 0}
    )
    return response['message']['content']


question = "How do I create a route in FastHTML?"
print(f"Question: {question}\n")
print(f"Answer with no retrieved context:\n{ask_without_rag(question)}")
Question: How do I create a route in FastHTML?
Answer with no retrieved context:
In FastHTML, you can create routes using the `@route` decorator.
Here's an example of how to define a simple route:
```rust
use fasthtml::prelude::*;
#[fasthtml]
fn index() -> Html {
html! {
<div>
<h1>Welcome to my app!</h1>
</div>
}
}
#[fasthtml::route("/")]
fn home() -> Html {
html! {
<div>
<h1>Home Page</h1>
</div>
}
}
```
In this example, we define two routes: `/` and `/`. The `@route` decorator is used to specify the route for each function.
You can also use path parameters in your routes by adding them inside parentheses:
```rust
#[fasthtml::route("/users/{username}")]
fn user(username: String) -> Html {
html! {
<div>
<h1>Welcome, {username}!</h1>
</div>
}
}
```
In this example, the `/users/{username}` route will capture a `username` parameter and pass it to the `user` function.
You can also use multiple routes for the same function by using the `@route` decorator with different path patterns:
```rust
#[fasthtml::route("/")]
fn index() -> Html {
html! {
<div>
<h1>Welcome to my app!</h1>
</div>
}
}
#[fasthtml::route("/users/{username}")]
fn user(username: String) -> Html {
html! {
<div>
<h1>Welcome, {username}!</h1>
</div>
}
}
```
In this example, the `/` route will match the `index` function, and the `/users/{username}` route will match the `user` function.
Without retrieval, the model answers in Rust. Not a wrong FastHTML API, the wrong programming language.
This is the unavailable evidence problem from Lecture 6. FastHTML is a small Python library that a 3-billion-parameter model has essentially never seen, so without retrieval there is nothing for it to be accurate about. Every FastHTML-specific thing the tutor got right earlier in this notebook (the @rt decorator, def click(): return P('You clicked me!'), FastTags as m-expression mappings, positional parameters becoming children) came from the corpus.
What RAG does not do
RAG does not guarantee that the model uses the evidence well. Lecture 6 names two places a RAG system can fail, and retrieval addresses only the first. It puts relevant passages in front of the model; nothing compels the model to read them correctly, to tell reference material from a worked example, or to keep each description with the code it belongs to. That is exactly what we saw with the route question.
What RAG buys even when generation disappoints
Both answers are wrong, but only one is easy to check. Disproving the route answer means searching your local knowledge base. Disproving the Rust answer means searching the web, then judging which sources are authoritative and what they actually say, a judgement not easily automated in evals.
Grounding turns a claim that is expensive to check into one that is cheap to check, and more importantly checkable the same way multiple times over evaluation cycles.
That difference is what makes evaluation possible. With a known corpus you can write test questions, say which passage should support each answer, and check mechanically whether it was retrieved and used. Ungrounded text leaves you re-deciding, by hand and by eye, whether each answer sounds right.
The levers you have, and what each one is for
| Lever | What it addresses | What it costs |
|---|---|---|
| Retrieval (RAG) | Supplies knowledge the model does not have at all | A corpus to curate and an ingestion pipeline to maintain |
| Chunking | Which passages reach the model, and how much surrounding context survives the split | A choice you have to evaluate; no chunk size is right for every corpus |
| Metadata and filters | Whether the model can tell reference documentation from a worked example before it answers | Metadata has to be captured during ingestion and kept accurate |
| Prompt design | How firmly the model is told to stay inside its evidence and to abstain when it runs out | Cheap to try, but it cannot make a small model reliable |
| A larger model | How faithfully the supplied evidence is used | Disk, memory, and slower answers, and its claims still need checking |
Optional: try a larger model yourself
This notebook defaults to llama3.2 (3 billion parameters, about 2 GB) because the model has to fit on your machine. Unlike the other tutorials in this course, this stack is local, so you run whatever your own hardware can hold.
A larger model may improve how faithfully the retrieved evidence is used. qwen2.5:7b is a reasonable next step up if you would like to find out.
Hardware required. Roughly 5 GB of disk, and comfortably 16 GB of RAM. On an 8 GB machine a 7-billion-parameter model will become very slow. Expect noticeably longer waits for each answer than with llama3.2, whatever your hardware.
If your want to try it, pull the model in a terminal:
ollama pull qwen2.5:7bThen set the model in a new cell and re-run the two question cells above:
CHAT_MODEL = "qwen2.5:7b"How to compare, if you try it.
Apply the same checks we applied above:
Take each code block and search for it in
FastHTML.txt. Is it there, or invented?Take each description and find the chunk it came from. Does it describe the code it is attached to?
Does the answer distinguish user-facing examples from API reference, or present both as the same kind of advice?
Where the documentation does not answer the question, does the model say so, or fill the gap?
See Exploring Ollama Models at the end of this notebook for exploring models.
Closing Database Connections
When you’re done working with the database, it’s good practice to make sure connections are properly closed. Our get_db_connection() helper opens a new connection each time it is called, and every function above closes its own connection before returning, so nothing is left open between steps.
In production code you will often hold a single connection open across many operations instead, and then closing it becomes your responsibility. The cell below makes that full cycle explicit.
# Verify connection status and demonstrate proper cleanup
# In this implementation, connections are opened and closed within each function,
# but here's how you would explicitly close a connection if needed:

def close_connection_safely(conn):
    """Safely close a database connection."""
    if conn is not None and not conn.closed:
        conn.close()
        print("Connection closed successfully")
    else:
        print("No open connection to close")

# Example: Create a connection, use it, and close it properly
test_conn = get_db_connection()
cur = test_conn.cursor()
cur.execute("SELECT COUNT(*) FROM documents;")
count = cur.fetchone()[0]
print(f"Documents in database: {count}")
cur.close()
close_connection_safely(test_conn)
Documents in database: 1046
Connection closed successfully
Exploring Ollama Models
Ollama provides a library of open-source models you can run locally. Browse available models at:
Types of Models
Chat/LLM Models — For text generation and conversation.
Examples: llama3.2, mistral, gemma2, phi3, qwen2.5
Embedding Models — For converting text to vectors (used in RAG)
Examples: mxbai-embed-large, nomic-embed-text, bge-large, all-minilm
Look for models with “embed” in the name
To discover the embedding dimension, run:
response = ollama.embed(model="model-name-here", input="test")
len(response.embeddings[0])
Understanding Model Variants
Models often come in different sizes and quantizations:
llama3.2 - Default variant (usually the smallest recommended)
llama3.2:1b - 1 billion parameters (smaller, faster)
llama3.2:3b - 3 billion parameters (larger, smarter)
llama3.2:70b-q4 - 70B parameters, 4-bit quantization (reduced precision for lower memory)
Larger models = Better quality but slower and more RAM Quantization (q4, q8) = Compressed models that use less memory with slight quality trade-off
Useful Commands
  ollama list              # Show installed models
  ollama pull <model>      # Download a model
  ollama rm <model>        # Delete a model
ollama show <model> # Show model details (parameters, size, etc.)Documentation
Ollama Documentation: README.md
Model Library: https://
ollama .com /library Python API Reference: https://
github .com /ollama /ollama -python
Resetting the Database
If you want to re-run this notebook with a different embedding model, you’ll need to delete the existing table first. This is because:
Different embedding models produce different vector dimensions — The table schema is tied to a specific dimension.
Embeddings from different models are not comparable — Even if two models have the same dimension, their embeddings encode meaning differently. Mixing embeddings from different models would produce nonsensical similarity results.
To reset and start fresh:
Run the cell below to drop the documents table
Update
EMBEDDING_MODELandEMBEDDING_DIMin the configuration cell to match your new modelRe-run the notebook from “Initialize the Clients” onward
Changing only the chunk size or overlap does not require this reset, because the storage step clears and rewrites the table on each run.
# Drop the documents table to start fresh
# Uncomment and run this cell only when you want to reset the database

# conn = get_db_connection()
# cur = conn.cursor()
# cur.execute("DROP TABLE IF EXISTS documents;")
# conn.commit()
# cur.close()
# conn.close()
# print("Documents table dropped. You can now re-run the notebook with a different embedding model.")